Errno 3.1415
|
Errno 3.1415 29 July 2017 | ||||||||
|
Mechanical Team[edit | edit source]
The Flight[edit | edit source]
The GAS team launched two high altitude balloons on the morning of Saturday, July 29, 2017. These balloon launches went exceptionally well. The launch itself went quite smoothly with the first balloon scheduled to be airborn about 8am and the second balloon launched an hour later, at 9am. Our own payload was on the second balloon, along with HAB stack and an experiment by one of the Amateur Radio Club members. The first balloon contained the Japanese Students' payload. There were no mishaps during the flights of either balloons, and both came down in the same field about a quarter mile apart.
The Boom[edit | edit source]
After the cold deployment testing, the Mechanical Team decided to try a few different methods to either keep the boom warm or to slow down the curing process. The Mechanical Team made a boom and lined the outer layer with Kapton tape in order to slow down the curing process. At the time of the balloon launch, this boom was four weeks old. However, the boom deployed smoothly and inflated.
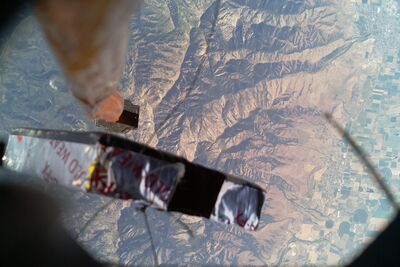
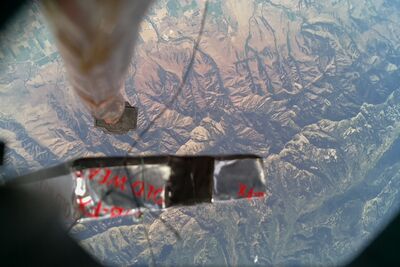
While the pictures that were retrieved show that the boom did indeed inflate, the boom did not cure during the flight. The Kapton lining the outer layer of the boom prevented any curing of the resin. The Kapton did help increase the lifespan of the boom, however. Moving forward, the Mechanical team will be looking into finding a different film to line the outer boom with, that will allow the UV curing resin to harden while also helping to prevent air from moving between the inner and outer layers.
The Structure[edit | edit source]
As the software team decided to run a Raspberry Pi in addition to the Arduino, the Mechanical Team modified the payload structure. The structure has been expanded with another shelf added to hold the Raspberry Pi and second battery.
Since the payload structure has been changed and expanded, the Mechanical Team needed to create some new insulation to fit the new structure. It was decided to extend the insulation to cover the bottom of the payload around the boom box. A simple system was designed to allow a piece of insulation to fall away when the boom was ready to be deployed. This piece of insulation was left to dangle from a string attached to the payload and can be seen in many of the airborn pictures taken.
The old insulation was lined with aluminum tape inside as well as out in order to make the insulation more durable and to prevent foam particles from getting onto the electrical boards. Unlike the old insulation, the new insulation uses electrical tape to line the inside of the insulation, while keeping the aluminum tape on the outside. Replacing the aluminum tape on the inside of the insulation also drastically reduced the weight of the insulation. The old box weighed about .94 lbs by itself. The new box, while bigger and made with more insulating material, only weighs .54 lbs.
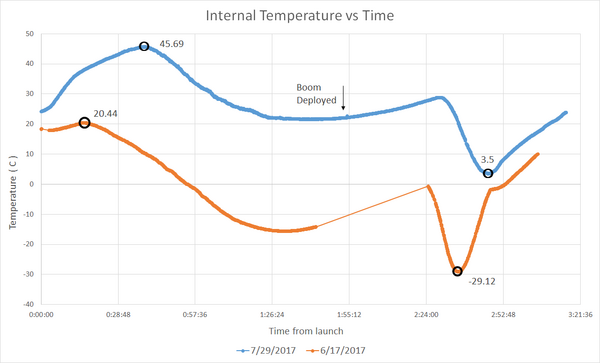
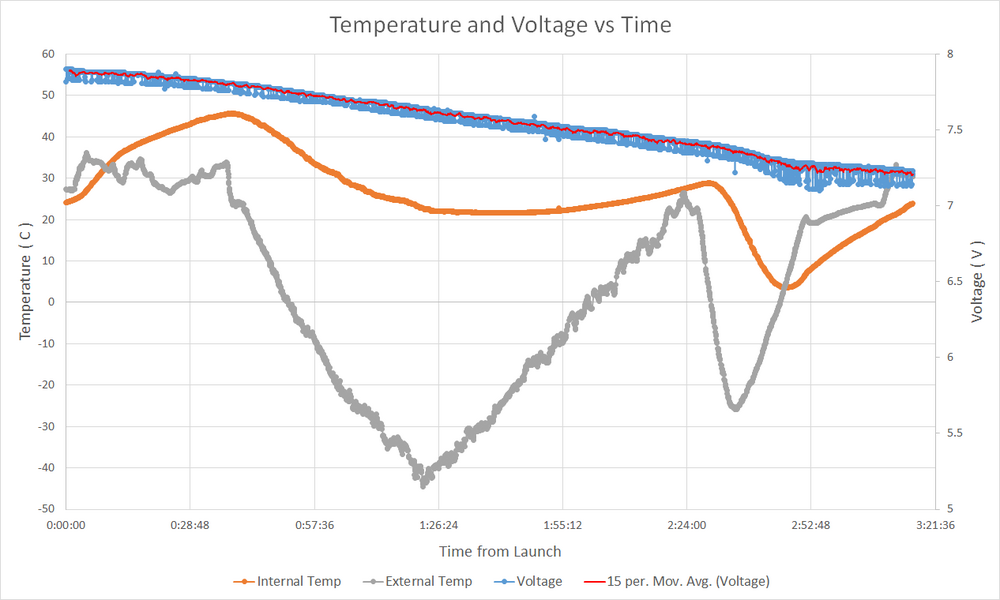
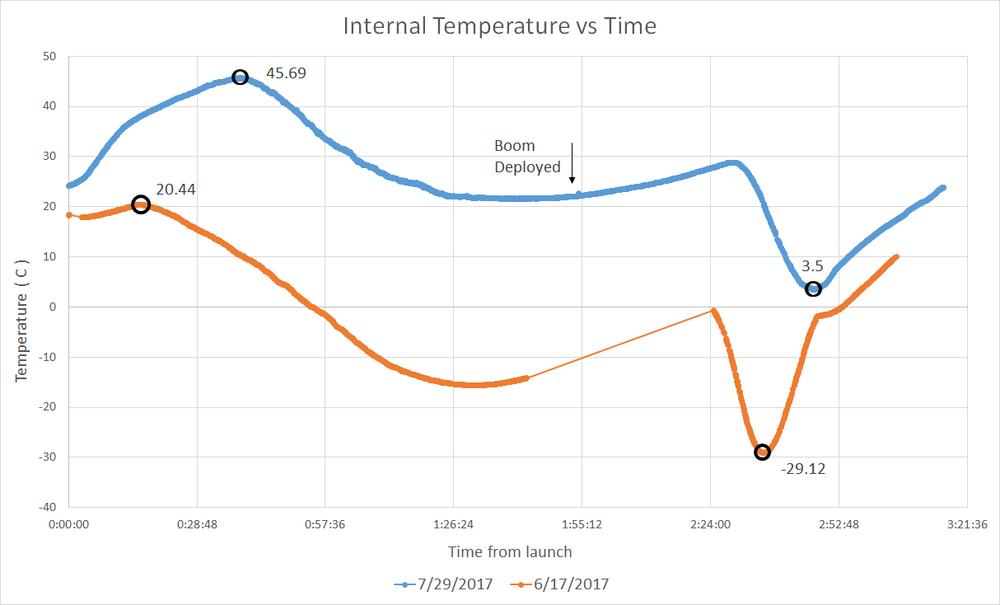
Because of two reusable hand warmers placed inside the insulation just prior to launch and the fact that the insulation covered the bottom of the payload, including the boom box, the temperature of the payload stayed much warmer. Internally, the box temperature peaked at 45.69 degrees Celsius and bottomed out only at 3.5 degrees Celsius. This is in stark contrast to our previous balloon flights, as seen in Graph 1.
Graph 1 compares the internal temperatures of the last two flights, the previous one launched 17 June 2017 and the current flight, 29 July 2017. Where the previous flight spent most of its airborn duration beneath the freezing point of water, our current flight never dipped below 0 degrees Celsius and was even just over the warmest temperature of the June flight upon boom deployment.
Moving Forward[edit | edit source]
This high altitude balloon launch can be considered a success. While the boom did not cure into a rigid structure, this flight showed evidence that the boom does inflate the way that we want it to. For the next balloon flight, the boom will likely be made without a Kapton lining on the outer layer to ensure that the boom will cure. The boom will be kept warm by the insulation to allow the resin and the boom to move freely upon deployment. However, the Mechanical team will still be looking for a different, UV transparent film to line the outer layer with, as the extra layer is beneficial for storage life of the boom. The flight provided good results and a lot of information, allowing for new goals to be worked towards.
Electrical Team[edit | edit source]
Camera[edit | edit source]
The only substantial change besides the structure of the payload was the addition of a Raspberry Pi, replacing the old uCam-II camera that had previously been used. A couple problems arose from the uCam-II, notably that upon attempting to take a picture, occasionally no data would be saved to the SD card and the camera would become stuck in a nearly infinite loop. We were unable to retrieve any pictures from the last few launches and have yet to find the exact cause of the error. As such, we changed cameras and determined to introduce a Raspberry Pi with the intent that the camera taking process would be detached from the rest of the Arduino's functionality. This was designed and implemented in order to allow us to see if the missing data was due to the camera impeding the SD card from saving the sensory inputs, considering that the Arduino cannot thread processes.
Our original design was to connect the Arduino and Raspberry Pi together, such that upon boom deployment and confirmation, a signal would be sent from the Arduino to the Pi. The Pi would be running a program that would, upon receiving the signal, begin taking pictures in an infinite loop with a thirty or so second delay between snapshots. However, due to time constraints, we were unable to connect the Arduino and Pi together appropriately.
Flight[edit | edit source]
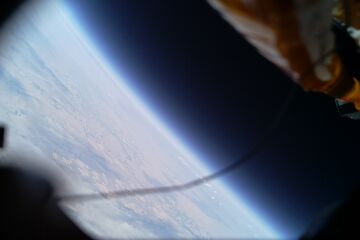
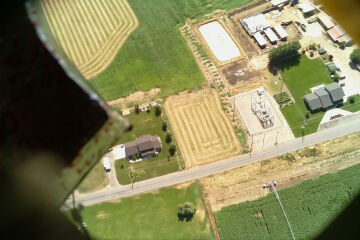
For the flight, though the Arduino and Raspberry Pi inhabited the same payload, they ran completely separate with their own individual power supply. The camera was mounted into the bottom where the old uCam-II once resided, and the Pi was running a program upon startup, taking pictures every thirty seconds. As such, upon recovery, there was upward of 390 pictures on the Pi, most of them of the black interior of the box. Upon deployment, many pictures of the inflated boom and distant earth surface were also taken, helping to prove our aeroboom concept. Also, we found that the SD card had no breaks in saved data, further solidifying our hypothesis that the uCam-II, when attempting to take a picture, had been interfering with the SD card.
Moving Forward[edit | edit source]
For future flights, we intend to attach the Arduino and Raspberry Pi together, such that communication between the two can be maintained. If this is not to be implemented before we fly the BeagleBone Black (BBB) instead of the Arduino, we will still attach the Raspberry Pi to the BBB. We have hopes of capturing a five minute video of the boom deployment, alongside the looping snapshots.
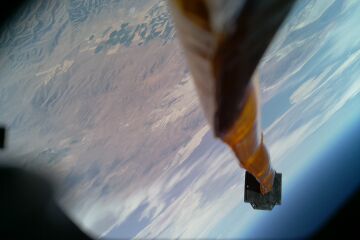
This pictures was probably taken shortly after the high altitude balloon burst. In its sudden descent, the payload was tipped to the side, capturing some of the horizon in the bottom right corner and giving us a clear view of the deployed boom as it deflated. The boom was not made with the UV resin to cure in its cylindrical shape, causing it to deflate again as it dropped altitude.
